Creating 3D Environments In Blender
Free Download Creating 3D Environments In Blender
Last updated 8/2024
MP4 | Video: h264, 1920x1080 | Audio: AAC, 44.1 KHz
Language: English | Size: 97.52 GB | Duration: 68h 8m
Learn Blender 3.2, 4.1, explore Geometry Nodes and create wonderful 3D environments
What you'll learn
Creating stunning unique environments
Learn Blender 3.2, 4.1
Working with Geometry nodes
Learn the Blender basics
Creating animated photo-scanned trees
Creating a procedural volumetric sky
Organize your workflow to make large environment scenes
Use 4k /8k PBR textures
Find motivation and inspiration to build your dream scene
Requirements
Blender version 3.2 and 4.1 or above
Computer ( min 16GB ram)
Description
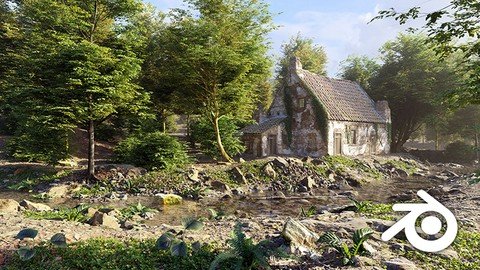
This fresh, new Blender 3.2 + 4.1 course update (Version 3.0) contains valuable information for anyone looking to build 3D Environments. If you are new to Blender, it explains all the basics, teaching everything from grass to building creation, from scratch. If you've used Blender 2.81, this brand-new course highlights all the new Blender 3.2 features you can use to create amazing 3D environments. This course now includes an entirely new chapters focused on Blender 4.1Create beautiful 3D environmentsCreating 3D environments is now more popular than ever, with a growing number of people mastering the skill of 3D crafting. Whether you are just starting out or already quite experienced, creating 3D environments can be a time-consuming and complex craft. During my 17 years creating these environments, I have faced and overcome many challenges. Having discovered the beauty and joy of 3D crafting, I now love nothing more than sharing my passion and wealth of experience with others. I hope this course sets you on the path to designing your own dream environment entirely in 3D.Learn everything from A to ZWhen I started 3D modeling, the only learning source I had was a printed book on random modeling. For me, it was enough to learn the basics, but without guidance, it's easy to get lost. Today, there are many online learning resources that offer a swifter path to success in this field. However, not all offer a complete A to Z on 3D crafting. That's why this 3D environment course is especially designed to cover everything you need to know to create stunning environments.Step-by-step guidanceDiscover everything you need to know to create your own 3D environments. Even if you have never touched Blender before, this course offers step-by-step guidance to help you with the basics so that you can feel comfortable using the software.With 40+ hours of video content, this course takes you from complete beginner to proficiency.Best of all, it's completely up to date. I developed the first version of this course in 2015 and I continually update and improve the content. In 2020, Version 2.0 covered the new Blender 2.8 UI, but the latest Blender 3.2 update meant it was time for another major overhaul. Version 3.0 has fully updated course material recorded in Blender 3.2 and 4.1, so you can follow along with ease.What will you learn in this course?· Blender basics, just enough to follow this course (fully documented with handbook)· Creating grass (Geometry nodes )· Creating trees (Geometry nodes )· Building a ruined landscape· Blending displaced materials· Creating a river scene. Creating a snow scene· Creating a procedural sky with clouds· Working with photo scanned structuresAnd much more!What included in this course?As always, I offer a course full of content, this time it's bigger than ever. The course uses free content from the Polyhaven CC0 platform, which I started with Greg Zahl in 2018 to provide textures, models and HDRi's for everyone to use. Simply go and pick the assets you like. A selection of 4K textures and models are included in the course, but feel free to download up to 16K from the Polyhaven platform.You'll also receive exclusive content you won't find on Polyhaven:· Photo-scanned rocks, tree barks, wooden beams, plants, ruins and a castle· Photo references (landscapes, buildings, flowers)· 125 pages of documentation for the introductory chapter· All Blender scene files (Blender 3.2 + 4.1).Chapter overviewChapter 1: Course introductionA short introduction what you will learn in each chapter. Also, some explanation about workflow and organization, motivation and inspiration and course related questions. Chapter 2: Blender basicsThis chapter learns you the Blender fundamentals. If you are new to Blender, this chapter helps you on track with a quick introduction of the interface and viewport and some of the most used tools. We also build a simple table/chair scene and build a dice scene with geometry nodes. This chapter comes with 125 pages of documentation.Chapter 3: Creating a grass sceneIn this chapter we start with making grass strands. We pack the strands in Geometry nodes and build a simple but realistic grass scene with the geometry Nodes system. We use proxy models to speed up the viewport and add some variation by modeling some flowers. In the end of this chapter, we animate the grass so you can render the scene in motion.)Chapter 4: Creating a forest path sceneBig topic in chapter 4 is tree creation. We use photo-scanned barks in combination with generated branches. We add twigs on the branches with the geometry nodes and provide this with an animation. We upgrade the grass template by adding a path generator so you can simply adjust the scene by drawing a path. (Chapter 5: Creating a ruined sceneIn this chapter we use the grass template and trees from the previous chapter and spend most of the time on the ruin structure. We build an advance material node to blend a brick and plaster material. We also model some bricks and scatter these on the structure with Geometry nodes. Chapter 6: Farmhouse river sceneThis course comes with lots of scanned rocks, this chapter is the ultimate scene to blend all the rocks to make a river scene. First we shape the terrain so we have a river bed. Most of the lectures cover the creation of the farmhouse. , this is the main structure of the scene. In the end of the chapter we scatter the river with rocks and animate the river. Chapter 7: Sunset castle sceneThis time we use a photo-scanned castle and blend the structure with the terrain. We build a sky with volumetric clouds and use the Nishita skylight to blend the sky to create a sunset. Chapter 8: Mountain ruin sceneThis large landscape combines all the best from all chapters. We use the grass, trees and path to create a mountain path. We fill the scene with scanned ruin structures and blend the sky with distance mountains.onderful environmental scene. All content and textures come from Texture/HDRI Haven and are included in the course. Chapter 9: Creating a frozen lakeEmbark on the creation of a serene frozen river set within a dense forest. Master the art of blending materials to achieve a seamless transition between rocks and water. Add life to your scene with realistic trees, finishing with snow and mist effects for a breathtaking result.Chapter 10: Creating a cabin in the snowEmbark with me on a personal journey through the realms of digital creation with my Blender 4.1 bonus chapter, crafted to guide you into the silent beauty of snow environments and the detailed charm of a medieval cabin, all nestled in a winter wonderland.About meMy name is Rob Tuytel and I have been a environment designer for the past 17 years. I have a huge passion for the Dutch 17th century and mainly focus on medieval architecture. I am Co-Founder of Polyhaven together with Greg Zahl. I love to study old environment paintings and use these as an inspiration for my work. You might know me from the Tears of Steel open Blender movie or from my previous environment course for Blender 2.81.
Overview
Section 1: Chapter 01 - Introduction (3.2)
Lecture 1 Lecture 01 - Organization and workflow
Lecture 2 Lecture 02 - Motivation and inspiration
Lecture 3 Lecture 03 - The old masters
Lecture 4 Lecture 04 - Asking questions
Lecture 5 Lecture 05 - Outro
Section 2: Chapter 02 - Starting with Blender (3.2)
Lecture 6 Introduction
Lecture 7 Lecture 01 - Installing Blender
Lecture 8 Lecture 02 - The Blender viewport
Lecture 9 Lecture 03 - The Blender interface
Lecture 10 lecture 04 - Modeling a table
Lecture 11 Lecture 05 - Modeling a chair
Lecture 12 Lecture 06 - Render engines
Lecture 13 Lecture 07 - Adding a texture
Lecture 14 Lecture 08 - Chair textures
Lecture 15 Lecture 09 - Modeling a dice
Lecture 16 Lecture 10 - Add a dice shader
Lecture 17 Lecture 11 - Make a scene render
Lecture 18 Lecture 12 - Introduction to Geometry Nodes
Lecture 19 Lecture 13 - Adding more dice holes
Lecture 20 Lecture 14 - Link Geometry data to material
Lecture 21 Lecture 15 - Replacing and render geometry dices
Lecture 22 Lecture 16 - Outro
Section 3: Chapter 3 - Creating grass (3.2)
Lecture 23 Introduction
Lecture 24 Lecture 01 - Asset Manager
Lecture 25 Lecture 02 - Modeling strands
Lecture 26 Lecture 03 - Complex strands modeling
Lecture 27 Lecture 04 - Adding a grass texture
Lecture 28 Lecture 05 - Organize strands
Lecture 29 Lecture 06 - Bending strands
Lecture 30 Lecture 07 - Add strand variation
Lecture 31 Lecture 08 - Updating grass material
Lecture 32 Lecture 09 - Building a grass patch (Geometry Nodes)
Lecture 33 Lecture 10 - Making grass patch variations
Lecture 34 Lecture 11 - Making a grass proxy
Lecture 35 Lecture 12 - Building a grass template
Lecture 36 Lecture 13 - Mixing grass patches
Lecture 37 Lecture 14 - Adding terrain displacement (Geometry Nodes)
Lecture 38 Lecture 15 - Improving grass material
Lecture 39 Lecture 16 - Mixing tall grass patch
Lecture 40 Lecture 17 - Modeling a white flower
Lecture 41 Lecture 18 - Modeling more flower leaves
Lecture 42 Lecture 19 - Adding flower texture
Lecture 43 Lecture 20 - Bending white flower
Lecture 44 Lecture 21 - Make flower variation
Lecture 45 Lecture 22 - Make a white flower patch + proxy ( Geometry Nodes)
Lecture 46 Lecture 23 - Modeling a yellow flower
Lecture 47 Lecture 24 - Making yellow flower variations
Lecture 48 Lecture 25 - Mixing yellow flower on grass template
Lecture 49 Lecture 26 - Animating grass + Camera
Lecture 50 Outro
Section 4: Chapter 4 - Creating a forest path (3.2)
Lecture 51 Chapter 4 - Introduction
Lecture 52 lecture 01 - Preparing a new scene template
Lecture 53 Lecture 02 - Building a path generator ( Gemoetry Nodes)
Lecture 54 Lecture 03 - Combine grass and path (Geometry Nodes)
Lecture 55 Lecture 04 - Blending path and terrain materials
Lecture 56 Lecture 05 - Improving terrain shader
Lecture 57 Lecture 06 - Working with M-tree
Lecture 58 Lecture 07 - Merging branches with tree root
Lecture 59 Lecture 08 - Blending tree material
Lecture 60 Lecture 09 - Tree twigs
Lecture 61 Lecture 10 - Creating tree twigs ( Geometry nodes)
Lecture 62 Lecture 11 - Building a medium size tree
Lecture 63 Lecture 12 - Merging branches with tree trunk
Lecture 64 Lecture 13 - Blending tree materials and adding tree twigs
Lecture 65 Lecture 14 - building a complex tree
Lecture 66 Lecture 15 - Completing complex tree
Lecture 67 Lecture 16 - Animating twigs
Lecture 68 Lecture 17 - Importing trees and shaping terrain
Lecture 69 Lecture 18 - Adding trees on terrain
Lecture 70 Lecture 19 - Making tree proxy
Lecture 71 Lecture 20 - Changing light and shape terrain
Lecture 72 Lecture 21 - Adding fog and HDRI map
Lecture 73 Lecture 22 - adding water plane
Lecture 74 Lecture 23 - Shaping terrain and adding rocks
Lecture 75 Lecture 24 - Adding plants and more rocks
Lecture 76 Lecture 25 - Scatter path with rocks
Lecture 77 Lecture 26 - scatter rocks on path (geometry nodes)
Lecture 78 Lecture 27 - Changing scene light
Lecture 79 Lecture 28 - Creating low scene fog
Lecture 80 Lecture 29 - Improving scene fog
Lecture 81 Bonus video - Path sattering
Lecture 82 Outro
Section 5: Chapter 5 - Ruine landscape (3.2)
Lecture 83 Introduction
Lecture 84 Chapter 5- Lecture 01 - preparing new scene template
Lecture 85 Chapter 5 - lecture 02 - Adding water plane
Lecture 86 Chapter 5 - Lecture 03 - Blending terrain material
Lecture 87 Chapter 5 - Lecture 04 - Changing grass scattering
Lecture 88 Chapter 5 - Lecture 05 - Adding distance trees
Lecture 89 Chapter 5 - Lecture 06 - Adding fog and deforming landscape
Lecture 90 Chapter 5 - Lecture 07 - Importing high resolution trees
Lecture 91 Chapter 5 - Lecture 08 - Making a ruine material
Lecture 92 Chapter 5 - Lecture 09 - Mixing displacement maps
Lecture 93 Chapter 5 - Lecture 10 - Adding sandstone layer
Lecture 94 Chapter 5 - lecture 11 - Mixing dirt layer
Lecture 95 Chapter 5 - Lecture 12 - Adding dark brick layer
Lecture 96 Chapter 5 - Lecture 13 - Building the ruine
Lecture 97 Chapter 5 - Lecture 14 - Building the tower and adding window holes
Lecture 98 Chapter 5 - Lecture 15 - Adding the ruine material
Lecture 99 Chapter 5 - Lecture 16 - Adding sandstone layers
Lecture 100 Chapter 5 - Lecture 17 - Building a roof and adding a texture
Lecture 101 Chapter 5 - Lecture 18 - Adding roof border and model single bricks
Lecture 102 Chapter 5 - Lecture 19 - Sculpting bricks
Lecture 103 Chapter 5 - Lecture 20 - Adding ruine bricks (Geometry nodes)
Lecture 104 Chapter 5 - Lecture 21 - Clean up ruine bricks
Lecture 105 Chapter 5 - Lecture 22 - Merging ruine in landscape
Lecture 106 Chapter 5 - Lecture 23 - Creating shrubs
Lecture 107 Chapter 5 - Lecture 24 - Making shrub proxy models
Lecture 108 Chapter 5 - Lecture 25 - Adding shrubs and making changes on landscape
Lecture 109 Chapter 5 - Lecture 26 - Adding small water plants
Lecture 110 Chapter 5 - Lecture 27 - Making small changes on the landscape
Lecture 111 Chapter 5 - Lecture 28 - Adding rocks and plants
Lecture 112 Chapter 5 - Lecture 29 - Bonus - Replacing ruine with photoscan
Lecture 113 Chapter 5 - Outro
Section 6: Chapter 6: Forest farmhouse scene (3.2)
Lecture 114 Introduction
Lecture 115 Lecture 01 - Creating a new scene template
Lecture 116 Lecture 2 - Creating a river
Lecture 117 Lecture 3 - Blending terrain materials
Lecture 118 Lecture 04 - Adding terrain displacement
Lecture 119 Lecture 05 - Adding distance plane + Trees
Lecture 120 Lecture 06 - Importing high resolution trees
Lecture 121 Lecture 07 - Shaping landscape _ more distance trees
Lecture 122 Lecture 08 - Adding river rocks
Lecture 123 Lecture 09 - Adding building blueprints
Lecture 124 Lecture 10 - Shaping the farmhouse
Lecture 125 Lecture 11 - Adding window and door holes + making a roof
Lecture 126 Lecture 12 - Adding farmhouse material
Lecture 127 Lecture 13 - Painting plaster on bricks
Lecture 128 Lecture 14 - Adding brick ornament
Lecture 129 Lecture 15 - Merging brick ornament with bricks
Lecture 130 Lecture 16 - Adding ornament displacement
Lecture 131 Lecture 17 - Add roof material + displacement
Lecture 132 Lecture 18 - Making a door frame
Lecture 133 Lecture 19 - Making a door and window
Lecture 134 Lecture 20 - Add window glass material
Lecture 135 Lecture 21 - Add chimney
Lecture 136 Lecture 22 - Add roof sealing
Lecture 137 Lecture 23 - Adding wall decoration
Lecture 138 Lecture 24 - Blending farmhouse with landscape
Lecture 139 Lecture 25 - Making a young tree
Lecture 140 Lecture 26 - Making a tree proxy model
Lecture 141 Lecture 27 - Adding young tree vertex layer
Lecture 142 Lecture 28 - Adding shrubs
Lecture 143 Lecture 29 - Adding river rocks scatter (Geometry Nodes
Lecture 144 Lecture 30 - Improving river rocks
Lecture 145 Lecture 31 - Making small landscape changes
Lecture 146 Lecture 32 - Adding plants
Lecture 147 Lecture 33 - Adding river displacement
Lecture 148 Lecture 34 - Grow ivy on farmhouse
Lecture 149 Lecture 35 - Scene Cleanup
Lecture 150 Outro
Section 7: Chapter 7 : Creating a castle sunset scene (3.2)
Lecture 151 Introduction
Lecture 152 Lecture 01 : Creating a new scene template
Lecture 153 Lecture 02 : Adding a distance plane
Lecture 154 Lecture 03 : Shaping the terrain
Lecture 155 Lecture 04 : Importing castle
Lecture 156 Lecture 05 : Importing and updating clouds
Lecture 157 Lecture 06 : Blending terrain
Lecture 158 Lecture 07 : Importing grass template
Lecture 159 Lecture 08 : Adding grass color attributes
Lecture 160 Lecture 09 : Adding reed
Lecture 161 Lecture 10 : Adding shrubs
Lecture 162 Lecture 11: Adding distance trees
Lecture 163 Lecture 12 : Improving foreground
Lecture 164 Lecture 13 : Importing high resolution trees
Lecture 165 Lecture 14 : Adding rock scatter
Lecture 166 Lecture 15 : Importing background ruine + plants
Lecture 167 Lecture 16 : Finalizing scene
Lecture 168 Chapter 7 : outro
Section 8: Chapter 8 : Creating a mountain ruine scene
Lecture 169 Introduction
Lecture 170 Lecture 01 : Creating a new scene template
Lecture 171 Lecture 02: Shaping the landscape
Lecture 172 Lecture 03 : Sculpting terrain
Lecture 173 Lecture 04 : Blending terrain textures
Lecture 174 Lecture 05 : Adding grass
Lecture 175 Lecture 06: Adding atmosphere
Lecture 176 Lecture 07: Blending grass with normal value
Lecture 177 Lecture 08: Importing ruine photoscan
Lecture 178 Lecture 09: Adding a background plane
Lecture 179 Lecture 10: adding a distance river
Lecture 180 Lecture 11: Sculpting background layer
Lecture 181 Lecture 12: Adding distance trees
Lecture 182 Lecture 13: Adding mountains
Lecture 183 Lecture 14: Making mountain variations
Lecture 184 Lecture 15: Creating alpha background trees
Lecture 185 Lecture 16: Blending alpha trees in background
Lecture 186 Lecture 17: Adding rocks scatter
Lecture 187 Lecture 18: Adding high resolution trees
Lecture 188 Lecture 19: Finalzing trees
Lecture 189 Outro
Section 9: Chapter 9 : Creating a frozen lake
Lecture 190 Introduction
Lecture 191 Lecture 01: Organizing outliner, starting the scene
Lecture 192 Lecture 02: Shaping terrain, adding material
Lecture 193 Lecture 03: Mixing Materials
Lecture 194 Lecture 04: Mixing the Ice material
Lecture 195 Lecture 05: Adding snow on terrain
Lecture 196 Lecture 06: Adding river rocks scans
Lecture 197 Lecture 07: Adding Cliff scans
Lecture 198 Lecture 08: Adding the trees
Lecture 199 Lecture 09: Creating a volume fog box
Lecture 200 Lecture 10: Adding a snow actor
Lecture 201 Lecture 11: Configure the falling snow
Lecture 202 Lecture 12 : Adding moving mist
Lecture 203 Lecture 13: Add motion to the camera
Lecture 204 Lecture 14: Rendering scene animation
Lecture 205 Lecture 15 : Rendering scene from different position
Section 10: Chapter 10: Cabin in the snow
Lecture 206 Snow cabin scene: Introduction
Lecture 207 Lecture 1: Preparing outliner, adding blueprints
Lecture 208 Lecture 2: Making the cabin base shape
Lecture 209 Lecture 3: Adding window and door holes
Lecture 210 Lecture 4: Adding foundation and cleanup basemesh
Lecture 211 Lecture 5: Adding cabin materials
Lecture 212 Lecture 6: Apply displacement on cabinmaterials
Lecture 213 Lecture 7: Making roof slates
Lecture 214 Lecture 8: Adding slates on cabin roof
Lecture 215 Lecture 9: Randomize roof slates
Lecture 216 Lecture 10: Adding side planks cabin
Lecture 217 Lecture 11: Using the carving tool to carveplanks
Lecture 218 Lecture 12: Making beams and planks
Lecture 219 Lecture 13: Making a window frame
Lecture 220 Lecture 14: Making window glass
Lecture 221 Lecture 15: Duplicating windows
Lecture 222 Lecture 16: Making a cabin door
Lecture 223 Lecture 17: Adding construction beams
Lecture 224 Lecture 18: Adding more construction wood
Lecture 225 Lecture 19: Creating a window hatch
Lecture 226 Lecture 20: Adding rocks on cabin foundation
Lecture 227 Lecture 21: Making a chimney
Lecture 228 Lecture 22: Adding roof details
Lecture 229 Lecture 23: Removing snow from chimney
Lecture 230 Lecture 24: Starting with the terrain
Lecture 231 Lecture 25: Adding terrain materials
Lecture 232 Lecture 26: Mixing terrain material
Lecture 233 Lecture 27: Adding snow on terrain
Lecture 234 Lecture 28: Appending snow and mist
Lecture 235 Lecture 29: Importing high resolution trees
Lecture 236 Lecture 30: Adding snow on trees
Lecture 237 Lecture 31: Adding 2D trees layer
Lecture 238 Lecture 32: Blending scanned rocks with terrain
Lecture 239 Lecture 33: Using geometry nodes for blendingplants
Lecture 240 Lecture 34: Scatter branches on the terrain
Lecture 241 Lecture35: Adding log scans on terrain
Lecture 242 Lecture 36: Shaping terrain and add motion tocamera
Lecture 243 Lecture 37: Rendering a scene animation
Section 11: Chapter 01 - Before we start (2.81)
Lecture 244 Lekture 01 - Course overview
Lecture 245 Lecture 02 - Udemy Dashboard
Lecture 246 Lecture 3 - Techniques from the old masters (2.81)
Lecture 247 Lecture 4 - Motivation and inspiration
Lecture 248 Lecture 5 - Workflow and organization
Section 12: Chapter 02 - Getting in touch with Blender (2.81)
Lecture 249 Lecture 01 - introduction
Lecture 250 Lecture 02 - Download and installing Blender 2.81
Lecture 251 Lecture 03 - Getting in touch with the blender viewport
Lecture 252 Lecture 04 - The Blender 3D interface
Lecture 253 Lecture 05 - Collections
Lecture 254 Lecture 06 - Eevee and Cycles
Lecture 255 Lecture 07 - The workbench
Lecture 256 Lecture 08 - Creating a simple object
Lecture 257 Lecture 09 - Making a dice
Lecture 258 Lecture 10 - Adding dice holes
Lecture 259 Lecture 11 - Adding a material
Lecture 260 Lecture 12 - Improving dice material
Lecture 261 Lecture 13 - Making a scene render
Section 13: Chapter 03 - Working with materials (2.81)
Lecture 262 Lecture 01 - Introduction to materials (2.81)
Lecture 263 Lecture 02 - Materials in the real world
Lecture 264 Lecture 03 - Materials in 3D scenes
Lecture 265 Lecture 04 - Building a material setup sphere
Lecture 266 Lecture 05 - Making colors with color ramp node
Lecture 267 Lecture 06 - Mixing image textures
Lecture 268 Lecture 7 - Mix plaster on the bricks
Lecture 269 Lecture 08 - Add sandstone border
Lecture 270 Lecture 09 - Add displacement and weight layer
Lecture 271 Lecture 10 - Optimizing node tree in groups
Lecture 272 Lecture 11 - Adding background images
Lecture 273 Lecture 12 - Building the wall
Lecture 274 Lecture 13 - Using the boolean modifier
Lecture 275 Lecture 14 - Remesh the wall
Lecture 276 Lecture 15 - Adding wall material
Lecture 277 Lecture 16 - Adding displacement map
Lecture 278 Lecture 17 - Adding weight layer sandstone
Lecture 279 Lecture 18 - Making a render
Lecture 280 Lecture 19 - recap
Section 14: Chapter 04 - Making a grass landscape (2.81)
Lecture 281 Lecture 01 - Introduction
Lecture 282 Lecture 02 - Making a scene template
Lecture 283 Lecture 03 - deform the landscape
Lecture 284 Lecture 04 - Importing the wall model
Lecture 285 Lecture 05 - Adding landscape material
Lecture 286 Lecture 06 - Adding landscape displacement
Lecture 287 Lecture 07 - Importing HDRI map
Lecture 288 Lecture 08 - Adding grass strand backplate
Lecture 289 Lecture 09 - Model a grass strand
Lecture 290 Lecture 10 - Adding strand details
Lecture 291 Lecture 11 - Adding strand texture
Lecture 292 Lecture 12 - Making strand variations
Lecture 293 Lecture 13 - making a grass clump
Lecture 294 Lecture 14 - making clump variations
Lecture 295 Lecture 15 - Convert grass clump
Lecture 296 Lecture 16 - Adding grass material
Lecture 297 Lecture 17 - adding terrain displacement
Lecture 298 Lecture 18 - Adding grass particle system
Lecture 299 Lecture 19 - improving grass looks
Lecture 300 Lecture 20 - adding particle texture
Lecture 301 Lecture 21 - grass color variation
Lecture 302 Lecture 22 - Modeling small reed
Lecture 303 Lecture 23 - modeling reed variation models
Lecture 304 Lecture 24 - Adding reed particle system
Lecture 305 Lecture 25 - Adding fog
Lecture 306 Lecture 26 - Mixing grass length
Lecture 307 Lecture 27 - Adding grass on the ruin
Lecture 308 Lecture 28 - Making scene improvements
Lecture 309 Lecture 29 - Recap
Section 15: Chapter 5 - Making a farm house landscape (2.81)
Lecture 310 Introduction Lecture
Lecture 311 Lecture 01- Making a scene template
Lecture 312 Lecture 02 - making a scene blockout
Lecture 313 Lecture 03 - Starting with the farmhouse
Lecture 314 Lecture 04 - Adding roofs
Lecture 315 Lecture 05 - Extending roof
Lecture 316 Lecture 06 - adding holes
Lecture 317 Lecture 07 - Adding bevels
Lecture 318 Lecture 08 - Making wooden bars
Lecture 319 Lecture 09 - Placing wooden bars
Lecture 320 Lecture 10 - adding roof and brick texture
Lecture 321 Lecture 11 - Adding texture variation
Lecture 322 Lecture 12 - Adding leaking texture
Lecture 323 Lecture 13 - Adding more leaking
Lecture 324 Lecture 14 - Making a window
Lecture 325 Lecture 15 - Adding texture and frame
Lecture 326 Lecture 16 - Merging window frames
Lecture 327 Lecture 17 - making window frame variations
Lecture 328 Lecture 18 - Merging windows with house
Lecture 329 Lecture 19 - making a door
Lecture 330 Lecture 20 - adding roof sealings
Lecture 331 Lecture 21 - Adding roof slates
Lecture 332 Lecture 22 - Adding roof slates on small roofs
Lecture 333 Lecture 23 - Creating a door hook
Lecture 334 Lecture 24 - Improving texture details
Lecture 335 Lecture 25 - improving building materials
Lecture 336 Lecture 26 - Importing house in scene
Lecture 337 Lecture 27 - Adding grass weight layer
Lecture 338 Lecture 28 - Importing grass
Lecture 339 Lecture 29 - Modeling dead leaves
Lecture 340 Lecture 30 - Adding dead leaves material
Lecture 341 Lecture 31 - adding dead leave particle layer
Lecture 342 Lecture 32 - making a tree with the sapling tool
Lecture 343 Lecture 33 - generating a birch tree
Lecture 344 Lecture 34 - Adjusting the root
Lecture 345 Lecture 35 - Adding weight layer branches
Lecture 346 Lecture 36 - Modeling birch leaves
Lecture 347 Lecture 37 - Merging leaves on twig
Lecture 348 Lecture 38 - Adding twigs on tree
Lecture 349 Lecture 39 - Updating twig material
Lecture 350 Lecture 40 - Making more birch trees
Lecture 351 Lecture 41 - fixing the root
Lecture 352 Lecture 42 - Importing the trees
Lecture 353 Lecture 43 - Adjusting the twig material
Lecture 354 Lecture 44 - Adding scene fog
Lecture 355 Lecture 45 - Adding grass variation
Lecture 356 Lecture 46 - Modeling reed
Lecture 357 Lecture 47 - making the reed curvy
Lecture 358 Lecture 48 - merging leaves on the stem
Lecture 359 Lecture 49 - Adding reed particles
Lecture 360 Lecture 50 - Adding small reed
Lecture 361 Lecture 51 - Adding path on terrain
Lecture 362 Lecture 52 - Making scene adjustments
Lecture 363 Lecture 53 - Scene compositing
Lecture 364 Final Lecture - Recap
Section 16: Chapter 06 - Creating nature assets (2.81)
Lecture 365 Lecture 01 - Introduction
Lecture 366 Lecture 02 - Importing assets from previous scenes
Lecture 367 Lecture 03 - Importing trees
Lecture 368 Lecture 04 - Modeling nettle leaves
Lecture 369 Lecture 05 - Modeling more nettle leaves
Lecture 370 Lecture 06 - Adding nettle texture
Lecture 371 Lecture 07 - Curvy leaves and modeling a nettle stem
Lecture 372 Lecture 08 - merging leaves with nettle stem
Lecture 373 Lecture 09 - making nettle variation
Lecture 374 Lecture 10 - Modeling celandine plant
Lecture 375 Lecture 11 - Curve the celandine
Lecture 376 Lecture 12 - Modeling celandine flower
Lecture 377 Lecture 13 - Merging the leaves and the stem on the flower
Lecture 378 Lecture 14 - Improving celandine flower
Lecture 379 Lecture 15 - Modeling plant leave
Lecture 380 Lecture 16 - Modeling plant stem and merging leaves
Lecture 381 Lecture 17 - Improving plant material
Lecture 382 Lecture 18 - making dry grass
Lecture 383 Lecture 19 - Modeling Ivy leave
Lecture 384 Lecture 20 - Building Ivy Branch
Lecture 385 Lecture 21 - Improving Ivy material
Lecture 386 Lecture 22 - Modeling field maple leave
Lecture 387 Lecture 23 - Making leaves curvy
Lecture 388 Lecture 24 - Modeling field maple twig
Lecture 389 Lecture 25 - making twig variations
Lecture 390 Lecture 26 - Generating field maple tree
Lecture 391 Lecture 27 - Adding trunk texture
Lecture 392 Lecture 28 - Adding twigs on tree
Lecture 393 Lecture 29 - Organizing trees
Lecture 394 Lecture 30 - recap
Section 17: Chapter 07 - Making a castle scene (2.81)
Lecture 395 Lecture 01 - Introduction
Lecture 396 Lecture 02 - Organizing scene template
Lecture 397 Lecture 3 - deforming the terrain
Lecture 398 Lecture 04 - Modeling castle blockout
Lecture 399 Lecture 05 - Modeling castle tower
Lecture 400 Lecture 06 - Adding holes and remesh
Lecture 401 Lecture 07 - Improving the towers
Lecture 402 Lecture 08 - Optimizing towers and improving materials
Lecture 403 Lecture 09 - Adding more texture layers
Lecture 404 Lecture 10 - Mixing texture layer towers
Lecture 405 Lecture 11 - Adding sandstone borders
Lecture 406 Lecture 12 - Adding roofing texture
Lecture 407 Lecture 13 - Improving roof texture
Lecture 408 Lecture 14 - modeling a window frame
Lecture 409 Lecture 15 - Making window variations
Lecture 410 lecture 16 - Modeling a sandstone window frame
Lecture 411 Lecture 17 - Merging windows with towers
Lecture 412 Lecture 18 - Modeling sandstone border for the tower
Lecture 413 Lecture 19 - Modeling the main structure base
Lecture 414 Lecture 20 - Modeling the broken walls
Lecture 415 Lecture 21 - Adding gun holes
Lecture 416 Lecture 22 - Addin g more gun holes
Lecture 417 Lecture 23 - Improving textures
Lecture 418 Lecture 24 - Adding holes in the main structure
Lecture 419 Lecture 25 - remesh the main structure
Lecture 420 Lecture 26 - Adding sandstone texture window layers
Lecture 421 Lecture 27 - Adding sandstone door texture layer
Lecture 422 Lecture 28 - Importing window frames
Lecture 423 Lecture 29 - Adding metal frames
Lecture 424 Lecture 30 - Modeling wall borders
Lecture 425 Lecture 31 - Adding extra walls
Lecture 426 Lecture 32 - Adding roof texture
Lecture 427 Lecture 33 - Modeling roof slates
Lecture 428 Lecture 34 - Modeling roof bars
Lecture 429 Lecture 35 - Modeling a small roof
Lecture 430 Lecture 36 - Making a roof sealing
Lecture 431 Lecture 37 - Modeling a hatch
Lecture 432 Lecture 38 - Merging hatches with the building
Lecture 433 Lecture 39 - Adding wall displacement
Lecture 434 Lecture 40 - Improving main structure
Lecture 435 Lecture 41 - Adding terrain displacement
Lecture 436 Lecture 42 - Adding path vertex layer
Lecture 437 Lecture 43 - Improving terrain
Lecture 438 Lecture 44 - Adding grass particle system
Lecture 439 Lecture 45 - Importing nature assets
Lecture 440 Lecture 46 - Adding small plants
Lecture 441 Lecture 47 - Adding small reed
Lecture 442 Lecture 48 - Importing trees
Lecture 443 Lecture 49 - Improving grass and importing hdri sky
Lecture 444 Lecture 50 - Adding weight layer towers
Lecture 445 Lecture 51 - Adding ivy branches
Lecture 446 Lecture 52 - Adding tall reed and water leaves
Lecture 447 Lecture 53 - Finalize scene
Lecture 448 Lecture 54 - Recap
This course is meant for artists who like to grow in their workflow,Beginners,Environment artists,Game level artists
Homepage
https://www.udemy.com/course/blender-environments/DDOWNLOAD
Rapidgator
jmoee.Creating.3D.Environments.In.Blender.part022.rar.html
jmoee.Creating.3D.Environments.In.Blender.part088.rar.html
jmoee.Creating.3D.Environments.In.Blender.part036.rar.html
jmoee.Creating.3D.Environments.In.Blender.part086.rar.html
jmoee.Creating.3D.Environments.In.Blender.part055.rar.html
jmoee.Creating.3D.Environments.In.Blender.part002.rar.html
jmoee.Creating.3D.Environments.In.Blender.part050.rar.html
jmoee.Creating.3D.Environments.In.Blender.part071.rar.html
jmoee.Creating.3D.Environments.In.Blender.part043.rar.html
jmoee.Creating.3D.Environments.In.Blender.part045.rar.html
jmoee.Creating.3D.Environments.In.Blender.part012.rar.html
jmoee.Creating.3D.Environments.In.Blender.part034.rar.html
jmoee.Creating.3D.Environments.In.Blender.part074.rar.html
jmoee.Creating.3D.Environments.In.Blender.part009.rar.html
jmoee.Creating.3D.Environments.In.Blender.part038.rar.html
jmoee.Creating.3D.Environments.In.Blender.part007.rar.html
jmoee.Creating.3D.Environments.In.Blender.part078.rar.html
jmoee.Creating.3D.Environments.In.Blender.part066.rar.html
jmoee.Creating.3D.Environments.In.Blender.part025.rar.html
jmoee.Creating.3D.Environments.In.Blender.part077.rar.html
jmoee.Creating.3D.Environments.In.Blender.part054.rar.html
jmoee.Creating.3D.Environments.In.Blender.part063.rar.html
jmoee.Creating.3D.Environments.In.Blender.part060.rar.html
jmoee.Creating.3D.Environments.In.Blender.part056.rar.html
jmoee.Creating.3D.Environments.In.Blender.part049.rar.html
jmoee.Creating.3D.Environments.In.Blender.part011.rar.html
jmoee.Creating.3D.Environments.In.Blender.part037.rar.html
jmoee.Creating.3D.Environments.In.Blender.part090.rar.html
jmoee.Creating.3D.Environments.In.Blender.part028.rar.html
jmoee.Creating.3D.Environments.In.Blender.part070.rar.html
jmoee.Creating.3D.Environments.In.Blender.part042.rar.html
jmoee.Creating.3D.Environments.In.Blender.part064.rar.html
jmoee.Creating.3D.Environments.In.Blender.part010.rar.html
jmoee.Creating.3D.Environments.In.Blender.part047.rar.html
jmoee.Creating.3D.Environments.In.Blender.part100.rar.html
jmoee.Creating.3D.Environments.In.Blender.part029.rar.html
jmoee.Creating.3D.Environments.In.Blender.part027.rar.html
jmoee.Creating.3D.Environments.In.Blender.part096.rar.html
jmoee.Creating.3D.Environments.In.Blender.part053.rar.html
jmoee.Creating.3D.Environments.In.Blender.part035.rar.html
jmoee.Creating.3D.Environments.In.Blender.part069.rar.html
jmoee.Creating.3D.Environments.In.Blender.part044.rar.html
jmoee.Creating.3D.Environments.In.Blender.part004.rar.html
jmoee.Creating.3D.Environments.In.Blender.part075.rar.html
jmoee.Creating.3D.Environments.In.Blender.part082.rar.html
jmoee.Creating.3D.Environments.In.Blender.part051.rar.html
jmoee.Creating.3D.Environments.In.Blender.part091.rar.html
jmoee.Creating.3D.Environments.In.Blender.part013.rar.html
jmoee.Creating.3D.Environments.In.Blender.part006.rar.html
jmoee.Creating.3D.Environments.In.Blender.part008.rar.html
jmoee.Creating.3D.Environments.In.Blender.part014.rar.html
jmoee.Creating.3D.Environments.In.Blender.part061.rar.html
jmoee.Creating.3D.Environments.In.Blender.part003.rar.html
jmoee.Creating.3D.Environments.In.Blender.part030.rar.html
jmoee.Creating.3D.Environments.In.Blender.part019.rar.html
jmoee.Creating.3D.Environments.In.Blender.part059.rar.html
jmoee.Creating.3D.Environments.In.Blender.part089.rar.html
jmoee.Creating.3D.Environments.In.Blender.part018.rar.html
jmoee.Creating.3D.Environments.In.Blender.part005.rar.html
jmoee.Creating.3D.Environments.In.Blender.part094.rar.html
jmoee.Creating.3D.Environments.In.Blender.part076.rar.html
jmoee.Creating.3D.Environments.In.Blender.part015.rar.html
jmoee.Creating.3D.Environments.In.Blender.part048.rar.html
jmoee.Creating.3D.Environments.In.Blender.part057.rar.html
jmoee.Creating.3D.Environments.In.Blender.part073.rar.html
jmoee.Creating.3D.Environments.In.Blender.part095.rar.html
jmoee.Creating.3D.Environments.In.Blender.part062.rar.html
jmoee.Creating.3D.Environments.In.Blender.part058.rar.html
jmoee.Creating.3D.Environments.In.Blender.part084.rar.html
jmoee.Creating.3D.Environments.In.Blender.part067.rar.html
jmoee.Creating.3D.Environments.In.Blender.part093.rar.html
jmoee.Creating.3D.Environments.In.Blender.part065.rar.html
jmoee.Creating.3D.Environments.In.Blender.part021.rar.html
jmoee.Creating.3D.Environments.In.Blender.part041.rar.html
jmoee.Creating.3D.Environments.In.Blender.part081.rar.html
jmoee.Creating.3D.Environments.In.Blender.part101.rar.html
jmoee.Creating.3D.Environments.In.Blender.part097.rar.html
jmoee.Creating.3D.Environments.In.Blender.part080.rar.html
jmoee.Creating.3D.Environments.In.Blender.part098.rar.html
jmoee.Creating.3D.Environments.In.Blender.part040.rar.html
jmoee.Creating.3D.Environments.In.Blender.part068.rar.html
jmoee.Creating.3D.Environments.In.Blender.part017.rar.html
jmoee.Creating.3D.Environments.In.Blender.part023.rar.html
jmoee.Creating.3D.Environments.In.Blender.part032.rar.html
jmoee.Creating.3D.Environments.In.Blender.part072.rar.html
jmoee.Creating.3D.Environments.In.Blender.part031.rar.html
jmoee.Creating.3D.Environments.In.Blender.part039.rar.html
jmoee.Creating.3D.Environments.In.Blender.part083.rar.html
jmoee.Creating.3D.Environments.In.Blender.part033.rar.html
jmoee.Creating.3D.Environments.In.Blender.part024.rar.html
jmoee.Creating.3D.Environments.In.Blender.part099.rar.html
jmoee.Creating.3D.Environments.In.Blender.part092.rar.html
jmoee.Creating.3D.Environments.In.Blender.part087.rar.html
jmoee.Creating.3D.Environments.In.Blender.part020.rar.html
jmoee.Creating.3D.Environments.In.Blender.part016.rar.html
jmoee.Creating.3D.Environments.In.Blender.part085.rar.html
jmoee.Creating.3D.Environments.In.Blender.part026.rar.html
jmoee.Creating.3D.Environments.In.Blender.part001.rar.html
jmoee.Creating.3D.Environments.In.Blender.part046.rar.html
jmoee.Creating.3D.Environments.In.Blender.part052.rar.html
jmoee.Creating.3D.Environments.In.Blender.part079.rar.html
Fikper Free Links
jmoee.Creating.3D.Environments.In.Blender.part064.rar.html
jmoee.Creating.3D.Environments.In.Blender.part021.rar.html
jmoee.Creating.3D.Environments.In.Blender.part014.rar.html
jmoee.Creating.3D.Environments.In.Blender.part089.rar.html
jmoee.Creating.3D.Environments.In.Blender.part079.rar.html
jmoee.Creating.3D.Environments.In.Blender.part086.rar.html
jmoee.Creating.3D.Environments.In.Blender.part006.rar.html
jmoee.Creating.3D.Environments.In.Blender.part028.rar.html
jmoee.Creating.3D.Environments.In.Blender.part034.rar.html
jmoee.Creating.3D.Environments.In.Blender.part007.rar.html
jmoee.Creating.3D.Environments.In.Blender.part024.rar.html
jmoee.Creating.3D.Environments.In.Blender.part022.rar.html
jmoee.Creating.3D.Environments.In.Blender.part081.rar.html
jmoee.Creating.3D.Environments.In.Blender.part029.rar.html
jmoee.Creating.3D.Environments.In.Blender.part045.rar.html
jmoee.Creating.3D.Environments.In.Blender.part010.rar.html
jmoee.Creating.3D.Environments.In.Blender.part001.rar.html
jmoee.Creating.3D.Environments.In.Blender.part016.rar.html
jmoee.Creating.3D.Environments.In.Blender.part042.rar.html
jmoee.Creating.3D.Environments.In.Blender.part065.rar.html
jmoee.Creating.3D.Environments.In.Blender.part066.rar.html
jmoee.Creating.3D.Environments.In.Blender.part003.rar.html
jmoee.Creating.3D.Environments.In.Blender.part076.rar.html
jmoee.Creating.3D.Environments.In.Blender.part092.rar.html
jmoee.Creating.3D.Environments.In.Blender.part061.rar.html
jmoee.Creating.3D.Environments.In.Blender.part095.rar.html
jmoee.Creating.3D.Environments.In.Blender.part072.rar.html
jmoee.Creating.3D.Environments.In.Blender.part020.rar.html
jmoee.Creating.3D.Environments.In.Blender.part030.rar.html
jmoee.Creating.3D.Environments.In.Blender.part096.rar.html
jmoee.Creating.3D.Environments.In.Blender.part056.rar.html
jmoee.Creating.3D.Environments.In.Blender.part051.rar.html
jmoee.Creating.3D.Environments.In.Blender.part084.rar.html
jmoee.Creating.3D.Environments.In.Blender.part032.rar.html
jmoee.Creating.3D.Environments.In.Blender.part012.rar.html
jmoee.Creating.3D.Environments.In.Blender.part047.rar.html
jmoee.Creating.3D.Environments.In.Blender.part035.rar.html
jmoee.Creating.3D.Environments.In.Blender.part062.rar.html
jmoee.Creating.3D.Environments.In.Blender.part078.rar.html
jmoee.Creating.3D.Environments.In.Blender.part044.rar.html
jmoee.Creating.3D.Environments.In.Blender.part033.rar.html
jmoee.Creating.3D.Environments.In.Blender.part053.rar.html
jmoee.Creating.3D.Environments.In.Blender.part038.rar.html
jmoee.Creating.3D.Environments.In.Blender.part099.rar.html
jmoee.Creating.3D.Environments.In.Blender.part057.rar.html
jmoee.Creating.3D.Environments.In.Blender.part050.rar.html
jmoee.Creating.3D.Environments.In.Blender.part037.rar.html
jmoee.Creating.3D.Environments.In.Blender.part043.rar.html
jmoee.Creating.3D.Environments.In.Blender.part004.rar.html
jmoee.Creating.3D.Environments.In.Blender.part085.rar.html
jmoee.Creating.3D.Environments.In.Blender.part083.rar.html
jmoee.Creating.3D.Environments.In.Blender.part069.rar.html
jmoee.Creating.3D.Environments.In.Blender.part063.rar.html
jmoee.Creating.3D.Environments.In.Blender.part013.rar.html
jmoee.Creating.3D.Environments.In.Blender.part074.rar.html
jmoee.Creating.3D.Environments.In.Blender.part091.rar.html
jmoee.Creating.3D.Environments.In.Blender.part097.rar.html
jmoee.Creating.3D.Environments.In.Blender.part015.rar.html
jmoee.Creating.3D.Environments.In.Blender.part009.rar.html
jmoee.Creating.3D.Environments.In.Blender.part017.rar.html
jmoee.Creating.3D.Environments.In.Blender.part036.rar.html
jmoee.Creating.3D.Environments.In.Blender.part040.rar.html
jmoee.Creating.3D.Environments.In.Blender.part088.rar.html
jmoee.Creating.3D.Environments.In.Blender.part055.rar.html
jmoee.Creating.3D.Environments.In.Blender.part068.rar.html
jmoee.Creating.3D.Environments.In.Blender.part101.rar.html
jmoee.Creating.3D.Environments.In.Blender.part027.rar.html
jmoee.Creating.3D.Environments.In.Blender.part039.rar.html
jmoee.Creating.3D.Environments.In.Blender.part011.rar.html
jmoee.Creating.3D.Environments.In.Blender.part005.rar.html
jmoee.Creating.3D.Environments.In.Blender.part071.rar.html
jmoee.Creating.3D.Environments.In.Blender.part041.rar.html
jmoee.Creating.3D.Environments.In.Blender.part031.rar.html
jmoee.Creating.3D.Environments.In.Blender.part008.rar.html
jmoee.Creating.3D.Environments.In.Blender.part046.rar.html
jmoee.Creating.3D.Environments.In.Blender.part067.rar.html
jmoee.Creating.3D.Environments.In.Blender.part090.rar.html
jmoee.Creating.3D.Environments.In.Blender.part052.rar.html
jmoee.Creating.3D.Environments.In.Blender.part059.rar.html
jmoee.Creating.3D.Environments.In.Blender.part060.rar.html
jmoee.Creating.3D.Environments.In.Blender.part049.rar.html
jmoee.Creating.3D.Environments.In.Blender.part018.rar.html
jmoee.Creating.3D.Environments.In.Blender.part098.rar.html
jmoee.Creating.3D.Environments.In.Blender.part077.rar.html
jmoee.Creating.3D.Environments.In.Blender.part002.rar.html
jmoee.Creating.3D.Environments.In.Blender.part087.rar.html
jmoee.Creating.3D.Environments.In.Blender.part075.rar.html
jmoee.Creating.3D.Environments.In.Blender.part019.rar.html
jmoee.Creating.3D.Environments.In.Blender.part025.rar.html
jmoee.Creating.3D.Environments.In.Blender.part082.rar.html
jmoee.Creating.3D.Environments.In.Blender.part054.rar.html
jmoee.Creating.3D.Environments.In.Blender.part058.rar.html
jmoee.Creating.3D.Environments.In.Blender.part100.rar.html
jmoee.Creating.3D.Environments.In.Blender.part073.rar.html
jmoee.Creating.3D.Environments.In.Blender.part023.rar.html
jmoee.Creating.3D.Environments.In.Blender.part026.rar.html
jmoee.Creating.3D.Environments.In.Blender.part070.rar.html
jmoee.Creating.3D.Environments.In.Blender.part080.rar.html
jmoee.Creating.3D.Environments.In.Blender.part093.rar.html
jmoee.Creating.3D.Environments.In.Blender.part048.rar.html
jmoee.Creating.3D.Environments.In.Blender.part094.rar.html
No Password - Links are Interchangeable